More than a year after the last post of our series regarding the Cloud Native Computing Foundation’s official Kubernetes Certified Administrator program, one might be surprised to see that Kelsey Hightower’s tutorial, Kubernetes the Hard Way, remains one of the main sources to prepare for the exam. But it has earned that distinction. It indeed provides a comprehensive and extensive way of practicing what you will need to know to earn certification.
A Recap, and Some Changes
Before we dive into Chapter 4, let’s do a quick refresher.
Since our last post, Hightower has changed the structure of the tutorial. Chapter one addresses only simple prerequisites for your local environment (Google Cloud SDK and tmux), chapter two deals with two prerequisite tools, kubectl and cfssl, and chapter one explains how to create the required infrastructure in Google Cloud Platform (GCP). Upon following these guides successfully, you should have a ready-to-go local environment and your cloud infrastructure in GCP provisioned and configured.
Chapter 4: Provisioning a CA and Generating TLS Certificates
There is one more step to be executed before we start configuring our Kubernetes nodes and this step is provisioning the Certificate Authority (CA) as well as creating and distributing the server-client certificates for all Kubernetes components (API server, kube controller manager, kube scheduler, kubelet, and kube-proxy). These certificates will be used by the individual components to authenticate via the Transfer Layer Security (TLS) protocol with the API server. For starters, let’s go a level deeper and try to understand how PKI works.
A public key infrastructure (PKI) is a back-end cybersecurity measure that is described as a “set of rules, policies and procedures needed to create, manage, distribute, use, store, and revoke digital certificates and manage public-key encryption.” Although you can easily encrypt messages without PKI, a PKI infrastructure helps you verify the identity of whom you are talking to.
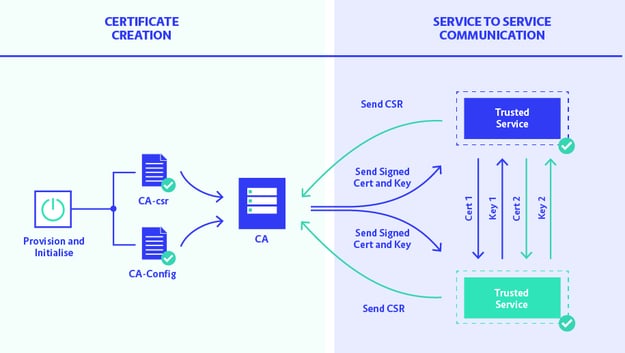
In the above diagram, two processes are illustrated: the creation and provisioning of the certificates on the right—a requirement for the communication between trusted services, which are depicted on the left of the diagram. First the Certificate Authority needs to be provisioned and initialized. Then, every service that needs to authenticate via TLS needs to send a certificate-signing request.
Afterwards, the CA provisions the certificate and private key for this service. Now the service has its trusted certificates and keys and can communicate via secure TLS communication with other trusted services.
Let’s jump back in our guide. As mentioned above, we will use the cfssl tool to build our PKI. Before explaining the guide, it is important to mention the two binaries we are going to use:
cfssl can be used locally (by providing a keypair that will be used to sign certificates) or remotely (request certificates from an instance running a CFSSL server).
cfssljson is used to unmarshal JSON responses from the CFSSL server, whether local or remote, for easy command-line manipulation. It can be used to save certificates to files or expose them via stdout. Unlike cfssl, cfssljson does not use subcommands.
Creating the Certificate Authority
As mentioned above, the cfssl binary can be used to sign certificates locally. This is a simple process and just needs arguments for -ca and -ca-key, pointing to files that contain the signing CA public certificate and private key respectively.
However, this requires that any node that is going to sign a certificate needs to have both the CA public key and the CA private key. In the case of a Kubernetes cluster, that means that each API server, node, etc., needs copies of the CA private key. In other words, the key is transferred across the network and the copies of the CA keys are stored on the remote servers.
In the guide, Hightower generates CA files with the following command:
cfssl gencert -initca ca-csr.json | cfssljson -bare ca
The first file (ca-config.json) includes the specific configuration of the certificate authority (expiration time and, most importantly, profile, which includes particular information for the cluster). The second is the certificate signing request (CSR) that includes the information to validate new requests for certificates. The gencert argument generates a private key and a certificate while the -initca parameter is used to initialise the CA. The outcome is two files, the CA certificate and the private key.
Creating the Server and Client Certificates
After the CA is configured and initialised, the guide goes on to create certificates for all the components, as well as a client certificate for the admin user. In all cases, the only file that is needed is a CSR that will be used to request a certificate from the CA. Therefore, in each case, the parameters of the cfssl command are the CA certificate, the CA private key, and the CA configuration file while passing as an object the specific component json configuration file.
Although most json configuration files seem similar, let’s note some key differences.
Generally, you will need to provide the following information to your CSR:
- Common name (CN)
- Company (or Organization, O)
- Company division (or Organization Unit, OU)
- Country (C)
- State (S)
- Locality (L) or City
Everything except the common name, should be the same as in the CA definition. The common name, though, differs depending on the component. For example, for the admin user it is “admin”, while for the Kubelet it is “system:node:${instance}”, which refers to the built-in node role in Kubernetes.
Another difference is the reference to hostnames and IPs on the Kubelet and API server configuration. The -hostname is a comma-separated hostname list that overrides the DNS names and IP address in the certificate SAN extension. (The Subject Alternative Name, or SAN, is an extension to the X.509 specification that allows users to specify additional host names for a single SSL certificate. The use of the SAN extension is standard practice for SSL certificates, and it's on its way to replacing the use of the common name).
Finally, after all the certificates are created, you will distribute them to the respective master and worker nodes.
Up Next
Make sure to check our blog for the next chapter of the series on Kubernetes the Hard Way. Next time we will explain how to generate cluster configuration files using the certificates we just created.
If you'd like to learn more about Kubernetes, check out our training course here: