

Recently, I’ve been experimenting with the Nix ecosystem. It offers an interesting and more integrated alternative than traditional configuration and infrastructure management systems such as Puppet, (Docker) containers and Terraform. I have looked into Nix, nixpkgs, NixOS and NixOps. Nix is a purely functional package management language, which aims to make the process of packaging reproducible. Nixpkgs is a set of curated packages that can be installed, described in Nix. You can use Nixpkgs on top of any modern Linux distribution. On OS X, it can be used as an alternative to homebrew. The Nix documentation contains instructions to install it on any Linux distribution and OS X. NixOS is a linux distribution based on nixpkgs, and NixOps is a tool to deploy NixOS on other (virtual) machines.
We’ll start by comparing Nix with some alternatives, after which I’ll dive into a example of how to set up a local marathon cluster. We wrap this post up with a conclusion.
Nix vs Converging Configuration Management Systems vs Docker
Converging Configuration Management Systems (CCMS), like Puppet, Chef and Ansible, work by modifying the system to match the desired state, by e.g. adding or removing packages or files. A typical problem that I have encountered in the past, is that removing packages or files does not happen automatically when you remove the install-this-package instruction from the CCMS' code. You explicitly have to tell the CCMS to remove the package, converge the system, and then delete the remove command from the CCMS’ code. Other issues include that identical machines that run the CCMS at two different points in time could very well end up in a different state, if you don’t take care to prevent this from happening by pinning e.g. version numbers. Note that it is possible to prevent it, it just takes some additional discipline and effort.
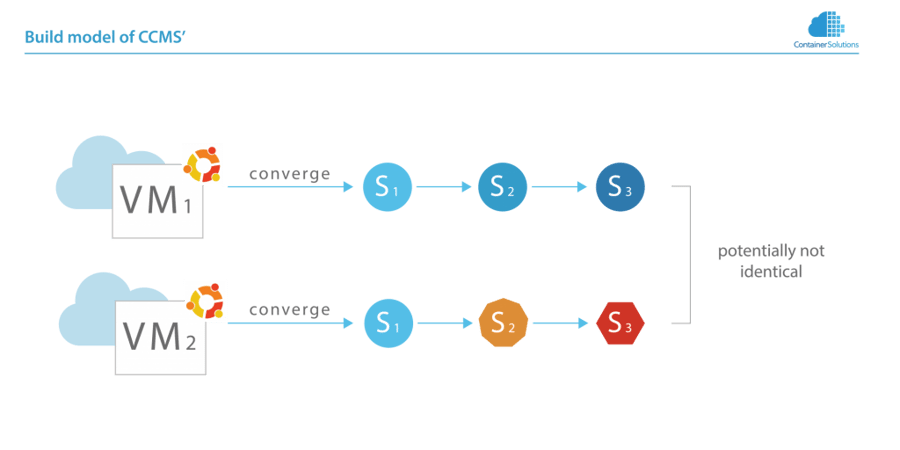
Start with a base image, run the CCMS to apply the changes on each VM. If no great care is taken to prevent divergence, the machines could diverge over time, and may diverge into different states.
This not only makes provisioning potentially divergent, rolling back to a previous version is not trivial; you need to undo your changes by writing code more code.
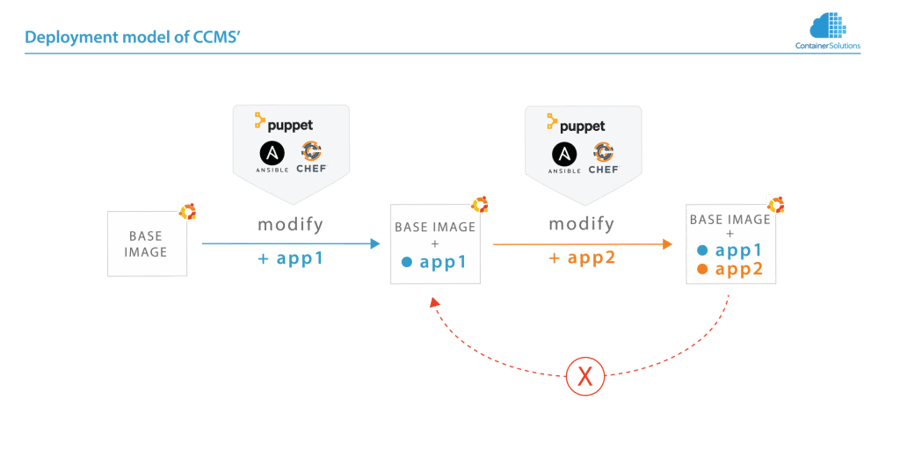
The deployment of CCMS' consist of running the CCMS against the machines, making changes to them. Once a change is made, rolling back to a previous version is not trivial.
There are various workarounds, such as using “golden images” that you build once using a CCMs. When you'd want to update your machines, you'd start again from this golden image, and run the CCMS again.
Docker solves these problems by using a “golden image” as it’s default modus operandi, and by having file system layers. Consider the following Dockerfile:
FROM ubuntu
# ...
RUN apt-get install -yq gcc
RUN apt-get install -yq vim mc
RUN apt-get install -yq big package
RUN some-expensive-operation
# ...
Each line in this Dockerfile results in a new file system layer. If you no longer want to have the package mc installed, you can simply modify the line in which you install this package, rebuild the image and it is gone! The disadvantage is that you changed a file system layer, all depending layers must be re-build, although you as a human know that the change should have no effect at all on the depending layers.
The new docker file looks like this:
FROM ubuntu
# ...
RUN apt-get install -yq gcc
RUN apt-get install -yq vim
RUN apt-get install -yq big package
RUN some-expensive-operation
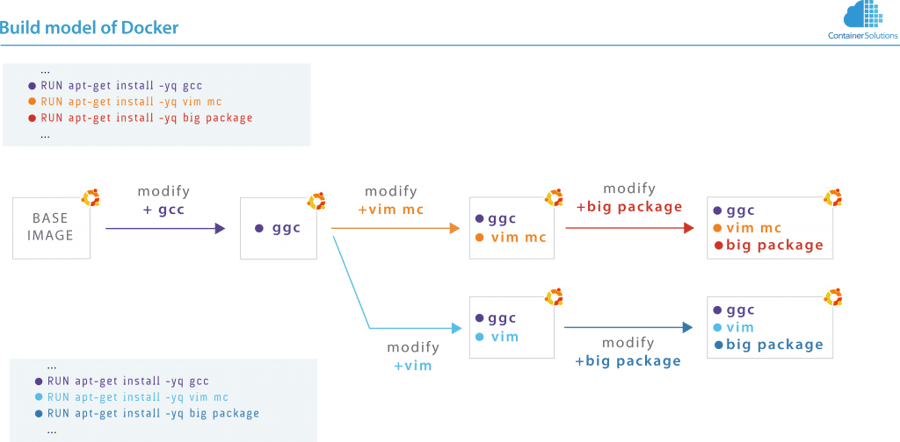
Docker offers a branching-but-no-merges model. If you modify a Dockerfile halfway, all dependent layers must be rebuilt.
Deployment consists of pulling the correct container image from a registry, and starting the container. Rolling back to a previous version is just a question of pulling and running the correctly tagged version of your container image.
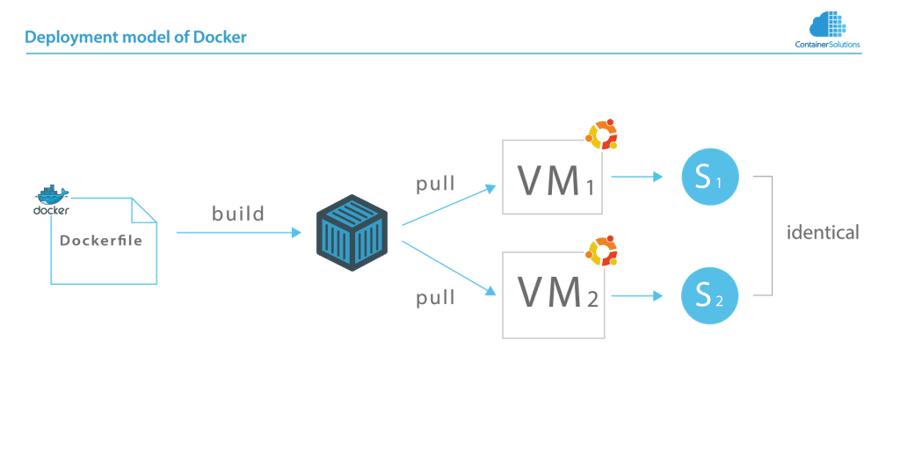
Docker provides identical runtime environments, by separating building a service and deploying it. First, a container is build from a Dockerfile, afer which diffferent machines can pull it from a registry. In the end, both are running exactly the same version of software.
NixOS does things differently. You can configure the state of the system by writing a “nix expression”; a description of how the system should look like.
As I mentioned in the introduction, Nix only has pure functions. This implies that a function always returns the same result for the same parameters. The function f(x) = x+1 is pure, but g(x)=x+time_of_day() is not.
Packages in nixpkgs, and your system configuration are implemented as pure functions. Therefore, building your system twice from the same input results in exactly the same state.
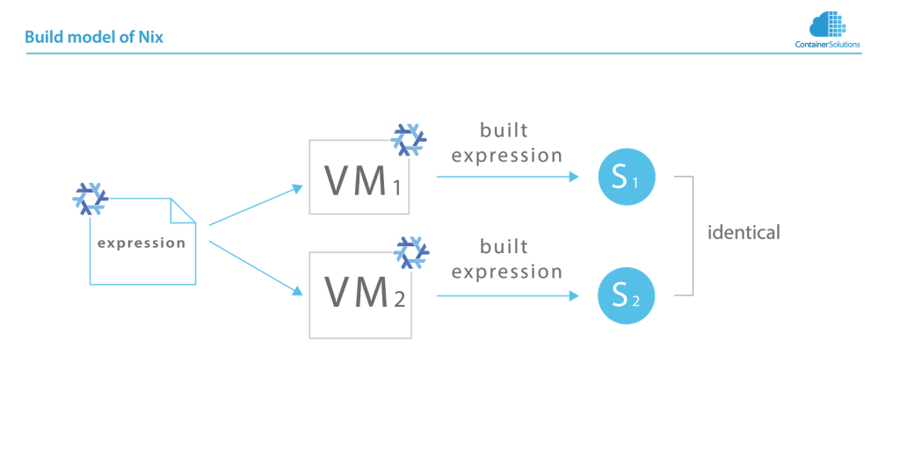
Expressions in Nix are pure functions. Hence, building the same expression on two distinct machines results in an identical state.
This has some interesting consequences! Given the two definitions in the figure below, if you build Expression 1, and then Expression 2 that depend on one shared packge P2, it can simply reuse package P2; rebuilding it would result in exactly the same package.
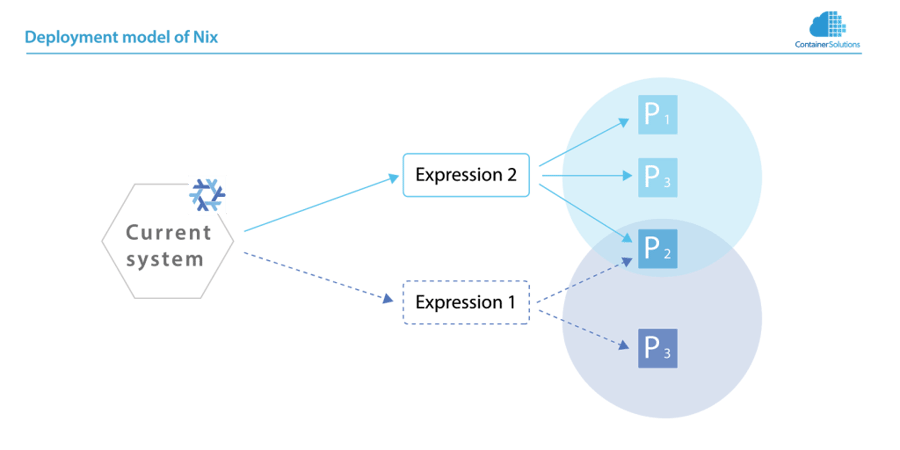
Deployment in nix consist of writing an expression that results in a dependency graph. Any dependency that is already present, can and will be shared.
There two P3's. They represent different versions of the same package. The P3 referenced by Expression 1 is an older version than the one referenced by Expression 2.
Nix offers atomic deployment of a new version of the systems configuration, by using the fact that updating symlinks is an atomic operation on UNIX. There is a global symlink pointing to some expression that models the systems configuration. We’ll get into the details of this in this blog post.
The point of all this, is that nix makes rollbacks trivial; it’s just a matter of updating one symlink. In our example, this implies that rolling back to Expression 1 would make P1 unavaible (but not remove it!) and downgrade P3.
If after some time, Expression 1 is not deemed to be needed anymore, it’s Garbage Collection root can be removed. By running nix-collect-garbage after removing this GC root, all unnecessary dependencies, in our example, P1, and the old P3, will be collected and removed.
NixOps vs Terraform
NixOps builds on top of NixOS, and offers a completely integrated environment to define (virtual) machines and the software that should be installed on them.
Terraform's documentation states:
"Terraform is not a configuration management tool, and it allows existing tooling to focus on their strengths: bootstrapping and initializing resources." (source)
NixOps offers this, but more. It manages changes in both infrastructure and installed software. It’s a combination of a configuration management tool and an infrastructure management tool.
We show an example of how NixOps works in the example below.
Extra components needed
When you manage a system with a CCMS, your infrastructure generally consists of VM’s with some Linux distribution, and your CCM’s repository that uses external libraries to manage the software on the VM’s.
If you’re using Docker, you are depending less on the features provided by the OS distribution. As shown by for example CoreOS, only a small core operating system with some basic utilities is needed. Rancher takes this to an even more extreme level, where the only purpose of the linux distribution is to run Docker containers that manage the system itself. However, a tool to manage the Containers themselves is still needed.
By using Nix, nixpkgs and NixOps, we stay can use the same abstraction mechanism to work on both the infrastructure, the installed software and its configuration.
Comparing CCMS’, Docker and Nix
The table below contains a rough comparison of CCMS’s, Docker and Nix.
| CCMS | Docker | Nix | |
|---|---|---|---|
| No divergence between machines | With effort | Safe | Safe |
| Repreducable builds | With effort | With effort | Yes |
| Rollback | With effort | Yes | Yes |
| Components | OS + CCMS | OS + Docker + Container Manager | Nix |
| Incremental builds | “Golden image” | Linear history | Dependency graph |
| Difficulty in usage | Harder | Easy | Harder |
Example: Setting up a Mesos and Marathon cluster
If you want to run the examples yourself (both on Linux and OS X), you should install Nix first from their download page. Note that it only touches files in /nix, so uninstalling nix is just a question of removing all those files.
To provision multiple machines with Nix, we can use NixOps. Once you have installed Nix, NixOps can be installed by running nix-env -i nixops. Make sure that you have installed VirtualBox, and created a hostonly network with the name vboxnet0, and a default NAT network. Some instructions on how to do this on OSX can be found here.
Note: In the next blogpost, we dive deeper in the Nix-language, and we’ll dissect the code below. For now, just take a quick glance at the code below
let
  # The colon states that this is a function, with an argument named id.
  makeMaster = id: {
    name = "mesos-master-${toString id}";
    value = { config, pkgs, lib, nodes, ... }: {
      deployment.targetEnv = "virtualbox";
      deployment.virtualbox.memorySize = 512;
      deployment.virtualbox.headless = true;
      networking.firewall.enable = false;
      services.zookeeper = {
        enable = true;
        id = id;
        servers = let
            zk_servers = map zk_server_line masterServers;
            zk_server_line = zk: (let
                zkId = toString nodes.${zk.name}.config.services.zookeeper.id;
              in "server.${zkId}=${zk.name}:2888:3888");
          in
            builtins.concatStringsSep "\n"  zk_servers;
      };
      services.mesos.master = {
        enable = true;
        zk = mesosZkString;
        quorum = (nrMasterServers / 2 ) + 1; # Ensure a quorum of at least half + 1.
      };

      services.marathon = {
        enable = true;
        zookeeperHosts = builtins.map (s: s.name + ":2181") masterServers;
        user = "root";
      };
    };
  };
  makeSlave = id: {
    name = "mesos-slave-${toString id}";
    # So 'value' is a function that takes an attribute set (Dictionary in python speak) as an input, and returns a new attribute set.
    value = { config, pkgs, lib, ... }: {
      deployment.targetEnv = "virtualbox";
      deployment.virtualbox.memorySize = 1024 * 2;
      deployment.virtualbox.headless = true;
      networking.firewall.enable = false;
      virtualisation.docker.enable = true;

      services.mesos.slave = {
        enable = true;
        withDocker = true;
        master = mesosZkString;
      };
    };
  };
  nrMasterServers = 3;
  nrSlaveServers = 2;
  # This generates a list [ { name = "mesos-master-0", value =  } { name = "mesos-master-1”; value =  } ]
  masterServers = builtins.genList makeMaster nrMasterServers;
  slaveServers = builtins.genList makeSlave nrSlaveServers;
  mesosZkString = let
                   zkServers = builtins.concatStringsSep "," (builtins.map (s: s.name + ":2181") masterServers);
                  in
                    "zk://${zkServers}/mesos";

in
  { network.description = "Marathon test"; }
    // builtins.listToAttrs masterServers
    // builtins.listToAttrs slaveServers
# The listToAttrs function builds an attribute set from a list of attribute sets with some { name = "attr_name"; value = "attr_value"; }. It returns a set { attr_name = "attr_value" }
Each master server uses 512MB of ram, and each slave uses 2GB’s. The current setup has three masters and two slaves, so it uses 5.5 GB. The minimum setup is to have just one master, and one slave, which would take 2.5GB of ram, you can set the nrMasterServers and nrSlaveServers to 1 in the marathon.nix file, if you do not have 5.5GB available.
You’ve got your marathon.nix ready? Let’s create a deployment named marathon, by running:
nixops create -d marathon marathon.nix
(out) created deployment ‘b8393c45-2673-11e6-9e82-208984d3285c’
(out) B8393c45-2673-11e6-9e82-208984d3285c’
This generates a unique ID to identify the deployment / stack you’ve created.
To actually create the VirtualBox VM’s and provision them, run:
nixops deploy -d marathon
NOTE: From time to time, this fails with the error "unable to active new configuration", caused by some virtualbox guest driver that has not been started properly. If this happens, you can just abort (CTRL+C) nixops, and try to deploy again. It always worked the second time I tried. I’ve only seen these error messages when working with the virtualbox backend. GCE posed no problems.
If you’d destroy this deployment (by running nixops destroy -d marathon) and redeploy it, you’ll see that only a very small part of the system configuration must be rebuild; the part that contains dynamic settings like IP addresses, which would be the service definitions that depend on the IP addresses and the overall OS configuration that uses these service definitions.
Let’s run some demo application on top of marathon!
You can inspect the state of the deployment by running nixops info:
nixops info -d marathon
(out)Network name: marathon
(out)Network UUID: b8393c45-2673-11e6-9e82-208984d3285c
(out)Network description: Marathon test
(out)Nix expressions: /home/maarten/cs/blog/nix/marathon.nix
(out)
(out)+----------------+-----------------+------------+------------------------------------------------------------+----------------+
(out)| Name           |      Status     | Type       | Resource Id                                                | IP address     |
(out)+----------------+-----------------+------------+------------------------------------------------------------+----------------+
(out)| mesos-master-0 | Up / Up-to-date | virtualbox | nixops-b8393c45-2673-11e6-9e82-208984d3285c-mesos-master-0 | t |
(out)| mesos-master-1 | Up / Up-to-date | virtualbox | nixops-b8393c45-2673-11e6-9e82-208984d3285c-mesos-master-1 | 192.168.56.109 |
(out)| mesos-master-2 | Up / Up-to-date | virtualbox | nixops-b8393c45-2673-11e6-9e82-208984d3285c-mesos-master-2 | 192.168.56.108 |
(out)| mesos-slave-0  | Up / Up-to-date | virtualbox | nixops-b8393c45-2673-11e6-9e82-208984d3285c-mesos-slave-0  | 192.168.56.105 |
(out)| mesos-slave-1  | Up / Up-to-date | virtualbox | nixops-b8393c45-2673-11e6-9e82-208984d3285c-mesos-slave-1  | 192.168.56.106 |
(out)+----------------+-----------------+------------+------------------------------------------------------------+-
Tip: install jq using nix-env -i jq, and abuse the fact that nixops can output JSON.
export MARATHON_ENDPOINT=http://`nixops export -d marathon | jq -r '.[].resources["mesos-master-0"].privateIpv4'`:8080
echo $MARATHON_ENDPOINT
(out)http://192.168.56.114:8080
Create a marathon application file named nginx.json with the following content:
{
  "id": "nginx",
  "container": {
    "type": "DOCKER",
    "docker": {
      "image": "mesosphere/simple-docker",
      "network": "BRIDGE",
      "portMappings": [
         { "hostPort": 0, "containerPort": 80, "protocol": "tcp"}
      ]
    }
  },
  "instances": 1,
  "cpus": 0.1,
  "mem": 64
}
And submit it to marathon:
curl -X POST $MARATHON_ENDPOINT/v2/apps -d @nginx.json -H "Content-type: application/json"
Cool, let’s see if we can find the IP and port of the service we just created.
curl -s $MARATHON_ENDPOINT/v2/apps/nginx | jq '.app.tasks'
(out)[
(out)  {
(out)    "id": "nginx.1a2ac376-2717-11e6-aee5-0800271e2037",
(out)    "host": "mesos-slave-1",
(out)    "ipAddresses": [],
(out)    "ports": [
(out)      31072
(out)    ],
(out)    "startedAt": "2016-05-31T10:04:46.994Z",
(out)    "stagedAt": "2016-05-31T10:04:45.812Z",
(out)    "version": "2016-05-31T10:04:45.691Z",
(out)    "slaveId": "10b80303-74f0-4b81-8619-7b969724ee89-S1",
(out)    "appId": "/nginx"
(out)  }
(out)]
Unfortunately, the hostname does not resolve from your host machine. Use nixops info to manually look this up, or run the following commands to let your computer do the work:
export NGINX_HOST=`curl -s $MARATHON_ENDPOINT/v2/apps/nginx | jq -r '.app.tasks[].host'`
export NGINX_PORT=`curl -s $MARATHON_ENDPOINT/v2/apps/nginx | jq -r '.app.tasks[].ports[]'`
export NGINX_IP=`nixops export | jq -r ".[].resources[\"$NGINX_HOST\"].privateIpv4"`
Cool, now we know on which slave and on which port the nginx instance is running. Let's see if we can read from it.
curl $NGINX_IP:$NGINX_PORT
(out)    <html>
(out)        <body>
(out)        <h1> Hello brave new world! </h1>
(out)        </body>
(out)    </html>
Yay, success!
Wrapping up
As you saw, with just 65 lines of Nix expression, we can describe arbitrary large marathon clusters. This is a testament to the power of abstraction offered by the nix tools. Using nix has some disadvantages though; nixos is a relative young distribution that is not backed by a tech giant yet. However, the same can be said for distributions like Gentoo or Debian. There are several companies using NixOS in production settings. Someone on Reddit suggests that Nix is used by Intel to verify their SSD’s. Over time, NixOS has the potential to grow in one of the big distributions and I guess it only takes some time before companies start to offer Nix support.
At the moment, I’m suggesting to take a look at Nix, and it’s model. I believe it’s a next step in the evolution of managing computer systems.
Looking forward
In the next blogpost, we’ll take a look at how nix-the-language works and we will dissect the marathon.nix file from this post, and show how we can modify this expression to create identical clusters on GCE and EC2.