
This week it's time to show you how easy it is to get started with writing a Mesos scheduler. Imagine just having a Docker Image, but you know that you further down the line need to add some pretty complex features into your scheduler, that are just not covered elsewhere. That's where Mesos-starter comes to the rescue.
Introduction to Tansu
Tansu is a distributed key value and lock store designed to maintain configuration and other data that needs to be highly available. It uses the Raft Consensus protocol to keep data synchronised. Tansu has a simple REST based using the open API specification (fka Swagger) that also streams changes to the client. By default it uses mDNS for membership making it simple to form a cluster. Tansu favours availability over consensus, with followers responding directly to read requests by default (which may be overriden on a per request basis). Requests are automatically routed within the cluster to the leader for locks, writes and deletions.
Creating the application
The easiest way to create a new Spring Boot application is by using the Spring Initializr. Give your new application a Maven GroupID and an ArtifactID. For Mesos-starter you don’t need any other Spring dependencies but we very much encourage you to add Actuator.
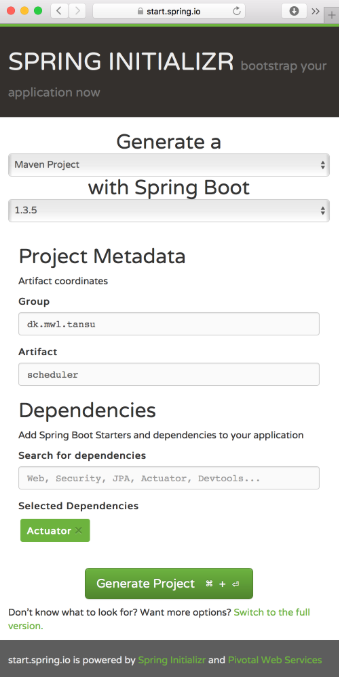
Finally hit the Generate Project button to download a preconfigured Maven project.
Unzip the download and import it into your favourite IDE.
At this point you might want to see if things actually build so go ahead and run a $ ./mvnw verify . If everything goes well the mvnw command should download a specific version of Maven plus all dependencies for the project and finally run an integration test on the application. A more or less empty application, mind you.
Knowing we have a working application, we can now add the Mesos-starter dependency. At the time of writing it is yet to be published in Maven Central so instead our Bintray repository can be added to your pom.xml file.
  bintray-containersolutions
  bintray
  http://dl.bintray.com/containersolutions/maven
That’ll give you access to the spring-boot-starter-mesos module.
  com.containersolutions.mesos
  spring-boot-mesos-starter
  0.2.2
With that on your classpath the application has now been turned into a fully fledged Mesos scheduler. Obviously the scheduler needs some configuration. First of all, a name by adding the following line to src/main/resources/application.properties
spring.application.name=Tansu
Name is important when the scheduler is checking in the framework.
Next up is allocating resources. For this use case 0.1 cpus and 64 MB memory is enough. Again, this is controlled through the application.properties file,
mesos.resources.cpus=0.1
mesos.resources.mem=64
And three instances of the application is needed
mesos.resources.count=3
The last resource we need for now is a port for the http interface.
mesos.resources.ports.tansu-http-port.host=ANY
This will expose an environment variable named TANSU_HTTP_PORT to the runtime with the actual port grabbed from the Mesos offers.
With resources in place we need to configure the task itself. Tansu is already distributed as a nice Docker image, which can be added with
mesos.docker.image=shortishly/tansu:0.28.0
Due to the way the Tansu nodes are finding each other with mdns they all need to be on the same network. There are a few ways to achieve that with Mesos. Either with some overlay network in Docker or you can just change the network adapter in the Docker container to be the host adapter
mesos.docker.network=HOST
Finally shelly needs to be switched off
mesos.environment.SHELLY_ENABLED=false
Starting the scheduler
With the application configured there isn’t much left before we can run the application and test it out. The easiest way for now is just to use the spring-boot:run target with a few parameters for setting the Mesos and Zookeeper endpoints.
MESOS_MASTER=172.16.33.10:5050 \
(out)MESOS_ZOOKEEPER_SERVER=172.16.33.10:2181 \
(out)./mvnw spring-boot:run
In this case I have Mesos and Zookeeper running on 172.16.33.10. Bare in mind that if you’re running on a Mac with the Mesos native library installed through Homebrew you might need to add
-Drun.jvmArguments="-Djava.library.path=/usr/local/lib"
to the end of the previous command.
Packaging it up
There are certainly several ways for packaging up the application but basically it comes down to wether you want to run it in a container or not. For this guide we will create a single jar that can easily be deployed with Marathon.
For the purpose of this guide, we will disable the unittests as it needs a little more explanation than there’s room for in this blog post. So add a @Ignore annotation to the SchedulerApplicationTest class.
With that sorted out the Maven package target will actually repackage the whole application in, what’s also called, a fat jar located under the /target folder. I recommend distributing the jar through a Maven repository, like an internal Nexus, GitHub releases or Bintray. As long as it can be downloaded through a http(s) url.
With that, you can deploy the framework in the usual fashion with Marathon or whatever you prefer. Just start the scheduler with
java -jar scheduler-0.0.1-SNAPSHOT.jar --mesos.master=master:5050 --mesos.zookeeper.server=zookeeper:
One more thing
Wouldn’t it be nice with a nice web interface where you can keep an eye on the scheduler and operate the handles of the application. Well you can, with Spring-Boot-Admin from Codecentric. Enabling it is fairly easy. First add the dependencies to the Maven build
  de.codecentric
  spring-boot-admin-server
  1.3.3

  de.codecentric
  spring-boot-admin-server-ui
  1.3.3

  de.codecentric
  spring-boot-admin-starter-client
  1.3.3
Put a @EnableAdminServer annotation on the SchedulerApplication class and add the following line to application.properties
spring.boot.admin.url=http://localhost:8080
Start up the application again and open your browser at localhost:8080. Under JMX and com.containersolutions.mesos.scheduler you will find an InstanceCount handle which can be turned either op or down.

Conclusion
At Container Solutions we believe there is a huge potential in Mesos-starter. The fact that a fully fledged Mesos framework can be written in a matter of hours is pretty outstanding. And the fact it’s designed with Spring in mind it also taps into a huge community of modules where only the sky is the limit.
It is also the reason why we are looking to get more projects on board so what we can collect some of all that Mesos experience that’s out there and share it with each other and, not to forget, the newcomers of Mesos.